인사이트
아키스케치 무료 3D 건축 설계 프로그램 사용법, 실무에 바로 활용해보세요
by Archisketch
Best 3D Software for Architecture: Try Archisketch for Practical Use
Why You Need the Best 3D Software for Architecture
When consulting clients, showing just 2D drawings versus intuitively presenting the space with 3D models makes a huge difference. Using 3D software improves consultation efficiency and client satisfaction significantly. That’s why more architects and designers are turning to 3D architecture design software to raise their consultation quality.
Many still use SketchUp for 3D architecture design, but it has some limitations:
SketchUp’s furniture and interior resources are limited.
It recognizes shapes based only on outlines, so it can’t properly interpret solid or curved surfaces without clear outlines.
For detailed design and rendering, users often need to rely on additional tools like CAD, Revit, or V-Ray.
The entire process—from drafting to modeling to rendering—requires using separate tools and plugins, which can make consultations time-consuming.
If you want a simpler and lighter 3D design tool than SketchUp, Archisketch offers an easy-to-use free 3D architecture design program. Here’s a simple 5-step guide to help you get started.
5-Step Guide to Boosting Architectural Design Productivity with Archisketch
Let’s explore Archisketch’s free architecture design program from A to Z.
Step 1. Access the 3D Architecture Design Software
First, click the [Login] button on the top right of the Archisketch homepage to sign up or log in. After logging in, click the [View My Projects] button appearing in the same spot to go to your personal project page.
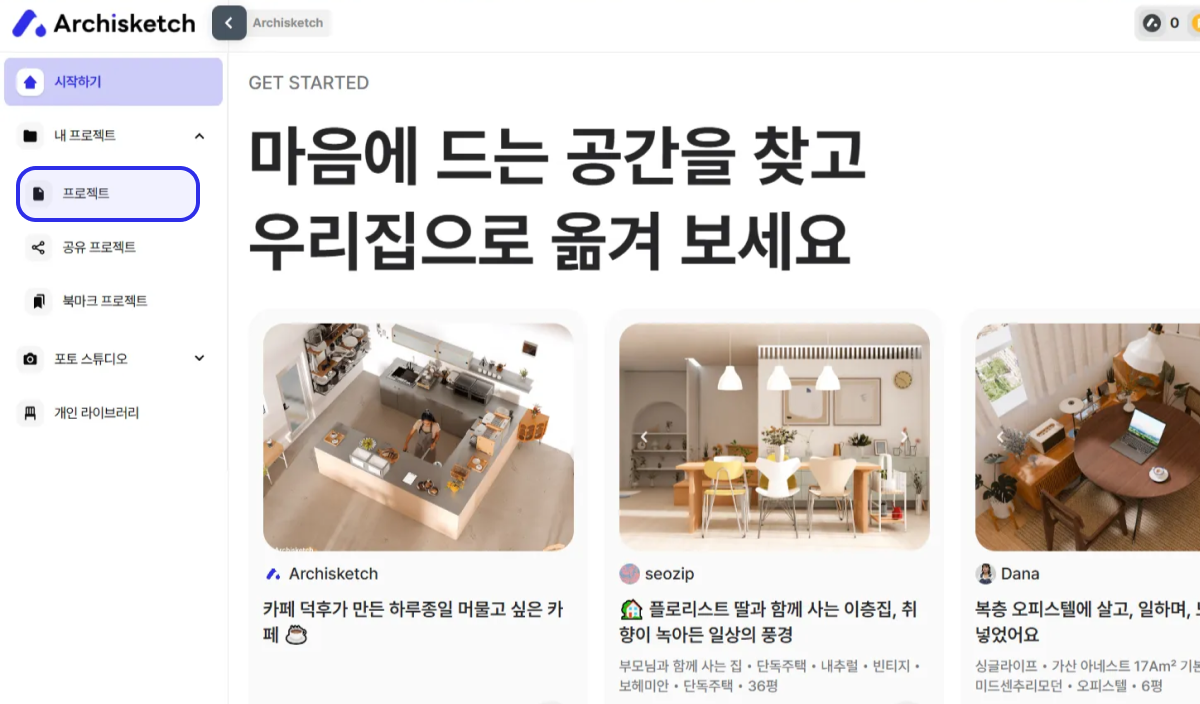
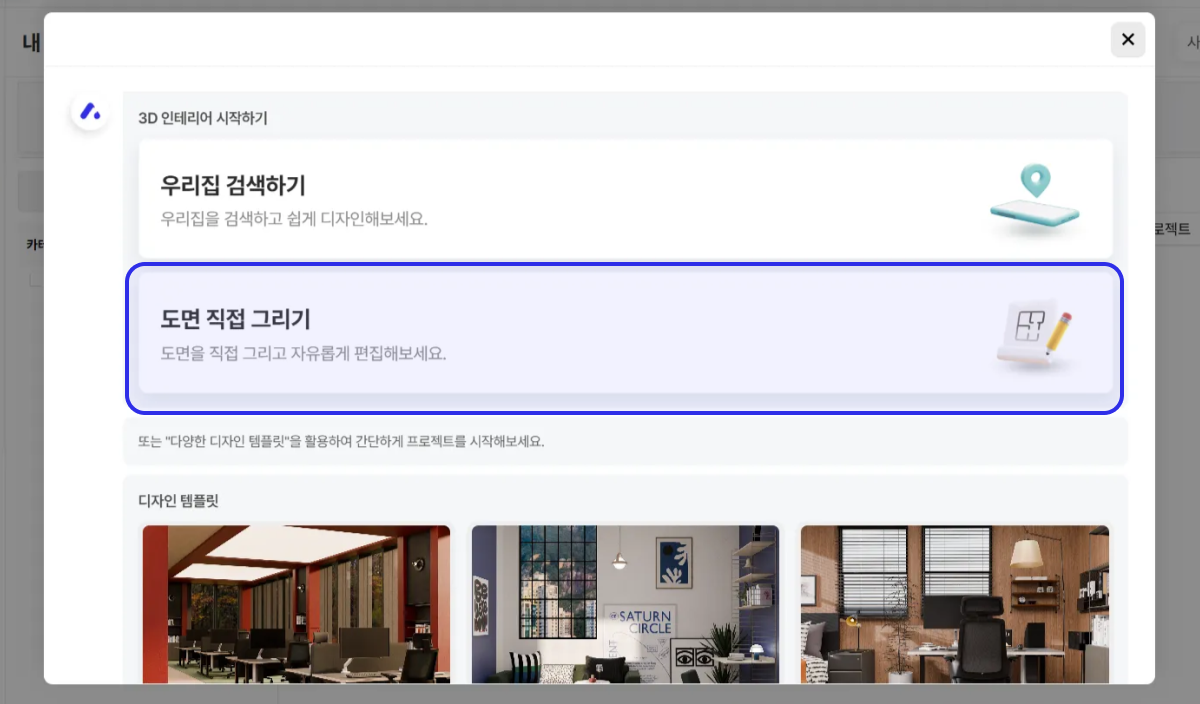
Step 2. Create a New Project and Draw Your Floor Plan
Select “My Projects” → “Projects” → “New Project” → “Draw Floor Plan” → choose “Blank Project.”
Among the options ‘Search My Home’ and ‘Draw Floor Plan,’ select the direct drawing method today. Simple descriptions below each option help you choose clearly.
Step 3. Configure the Floor Plan and Space Settings
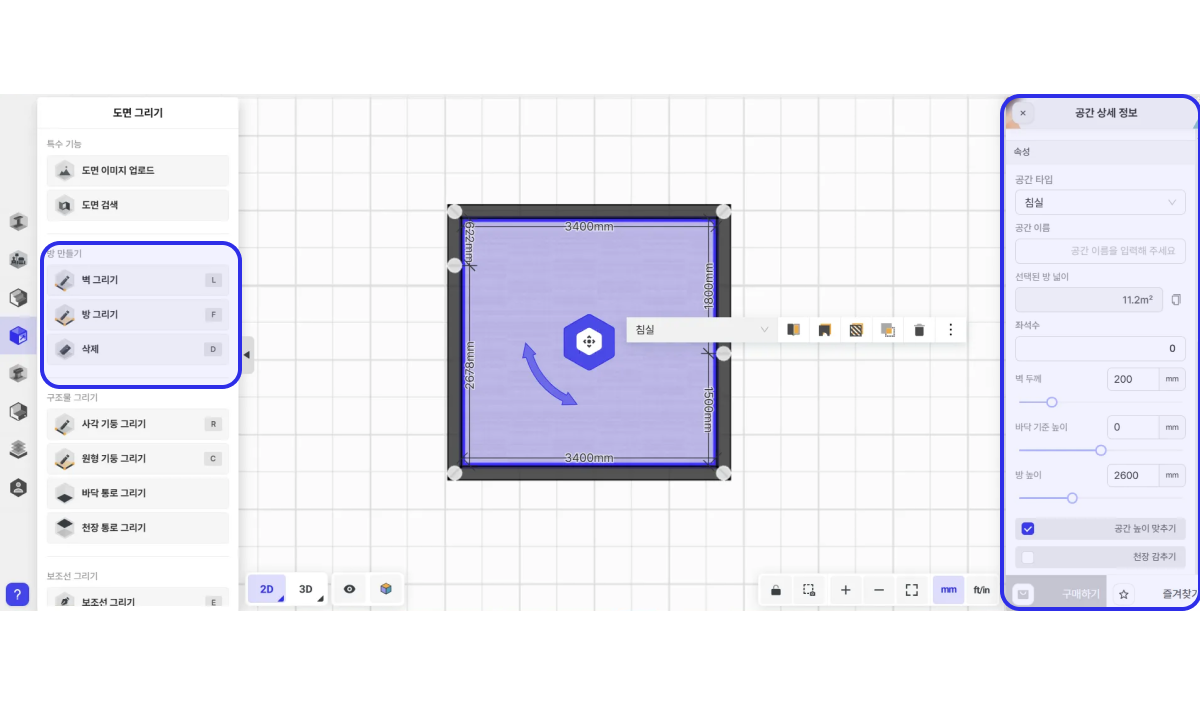
On the left drawing tab, you can find options such as “Create Room,” “Draw Structure,” “Draw Guide Lines,” and “General Functions.”
Create Room
Clicking “Create Room” generates a room with a default wall thickness of 200mm. Clicking the created space opens a detail tab on the right, where you can set floor and ceiling materials, room type, and name.
You can also customize architectural options like space height, wall thickness, and room height for results close to actual design.
When setting room properties, it’s very useful to specify detailed space usage, not just basic ones like living room, kitchen, or bedroom, but also children’s room, meeting room, or parking lot.
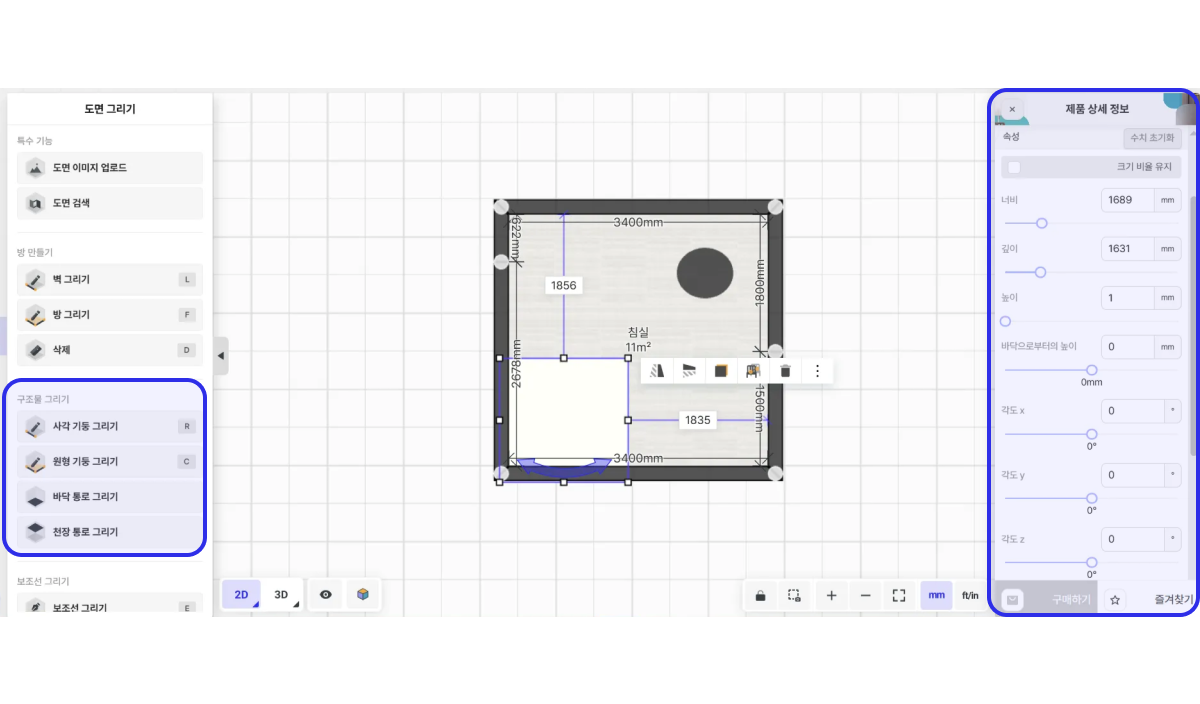
Draw Structure
Add key structural elements like columns or corridors within the space. Structures can be moved with the mouse, and you can finely adjust their size, position, corridor width, and length through the detail tab.
For example, it’s useful for multi-floor houses or loft-style rooms requiring vertical movement. This function allows precise and simple structural design, effectively used in real drafting.
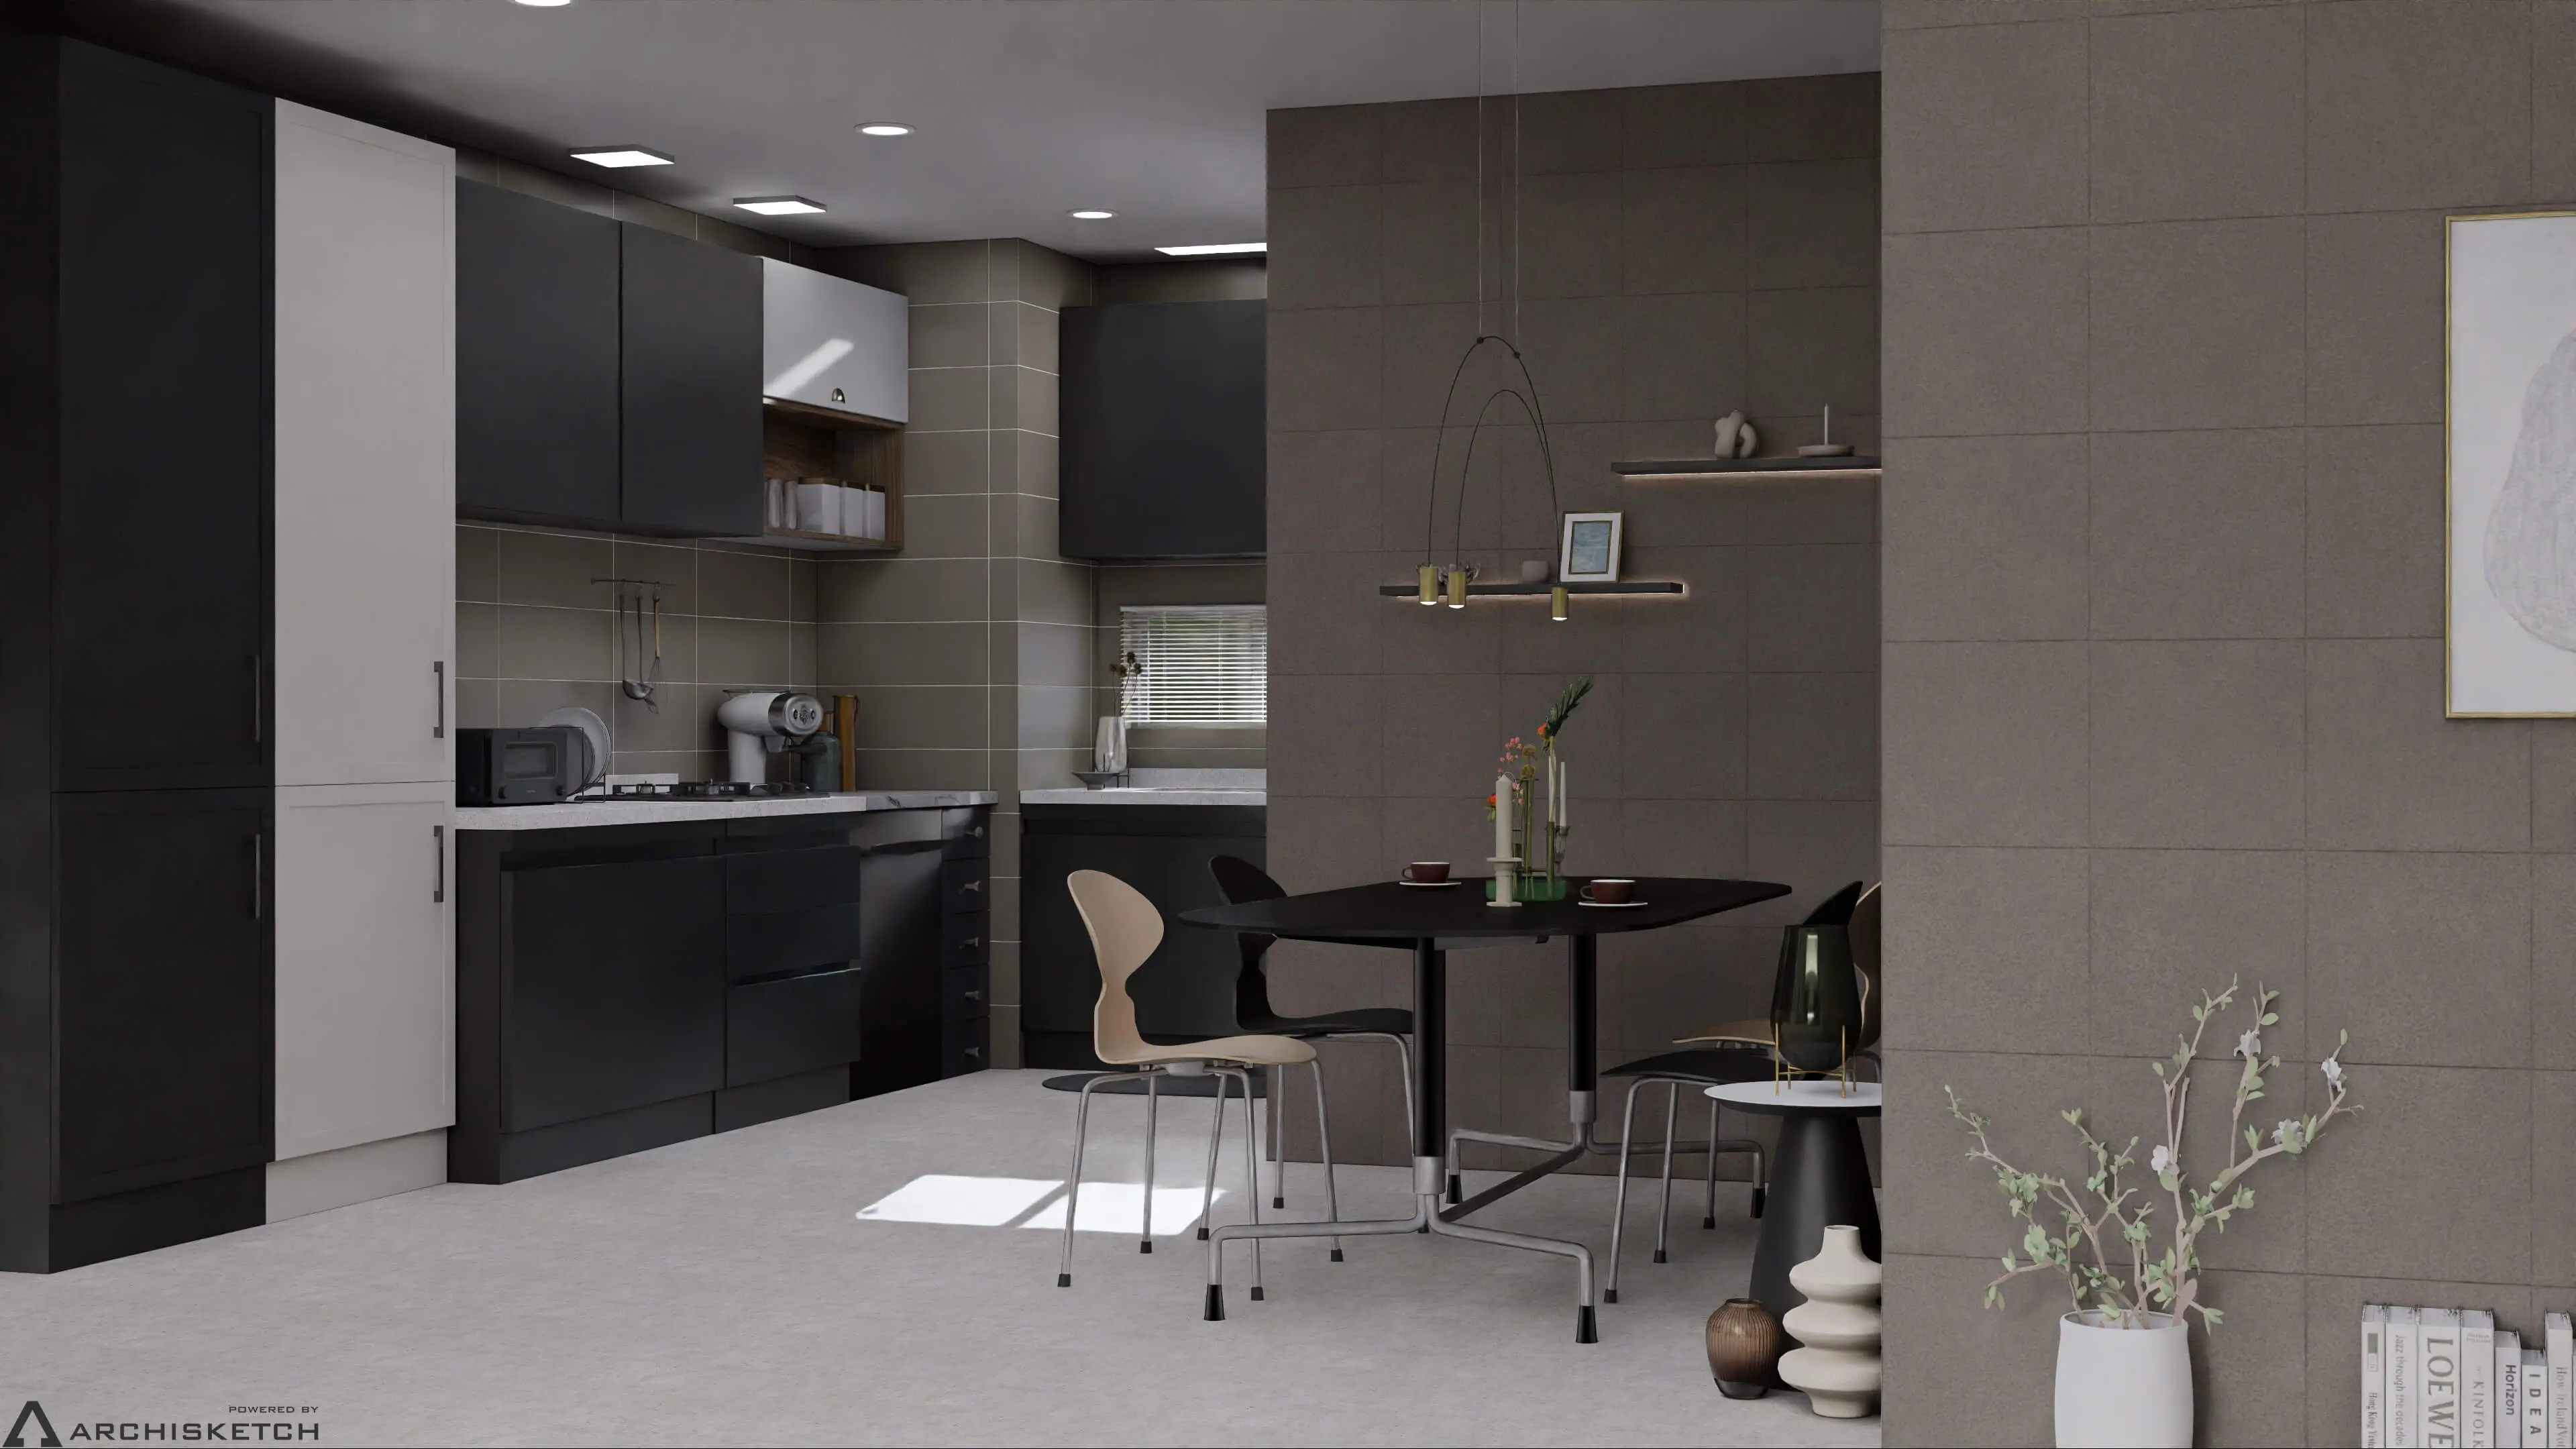
Step 4. Add Realistic Details by Setting Materials and Furniture
Now, decorate the space realistically with floor materials, ceiling finishes, and furniture placement.
Material Selection:
You can easily apply materials from the finish library. The materials include paint, concrete, wood, and more to freely create the room’s atmosphere. If clients request colors not available on the market, the palette feature lets you customize colors flexibly.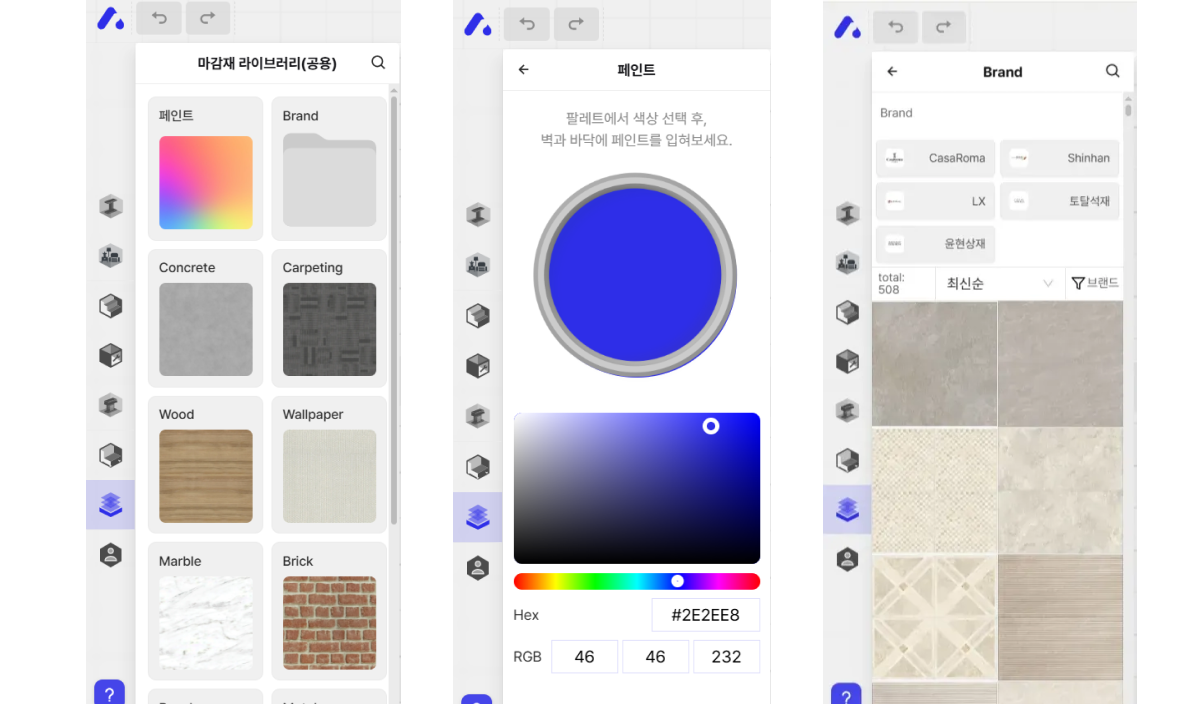
Furniture Placement:
The furniture library is intuitively organized by item categories like chairs, lighting, storage, as well as by space type such as bathroom or kitchen. For example, selecting “Kitchen” shows related furniture and accessories like cutting boards, kettles, and tea cups for easy placement.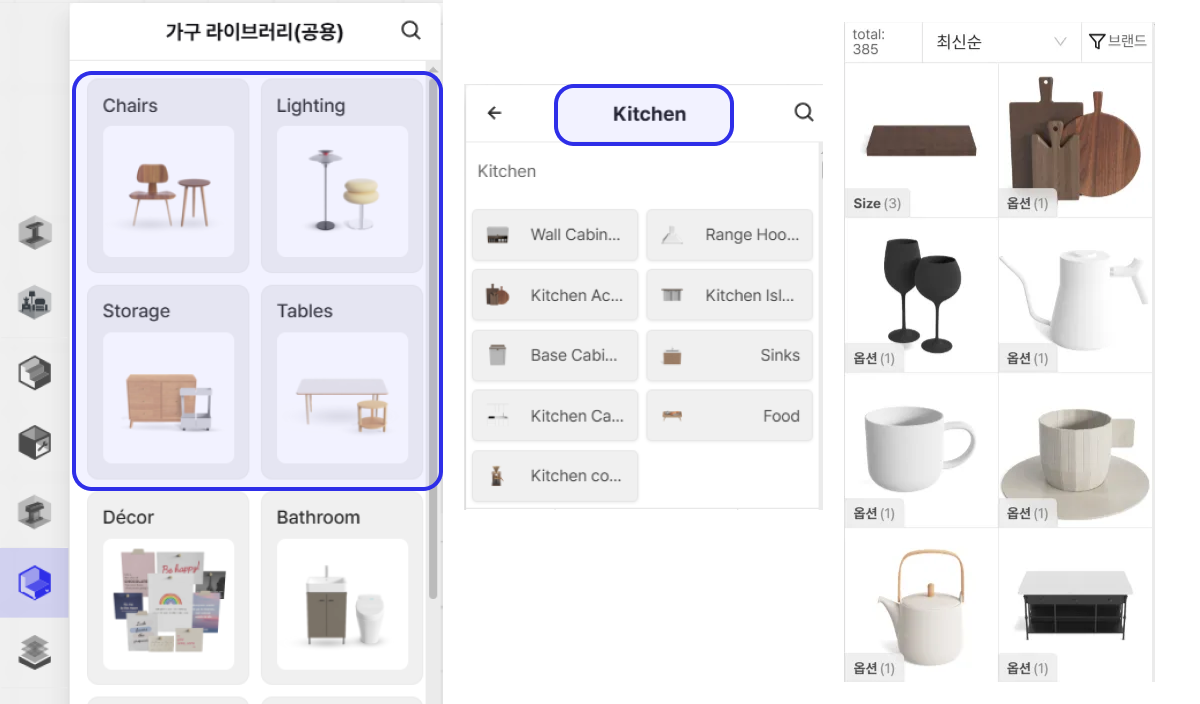
Furniture Options Adjustment:
You can precisely adjust selected furniture’s size, color, and design either by mouse or by entering exact values. The recommended products feature also suggests better alternatives to efficiently complete the ideal interior setup.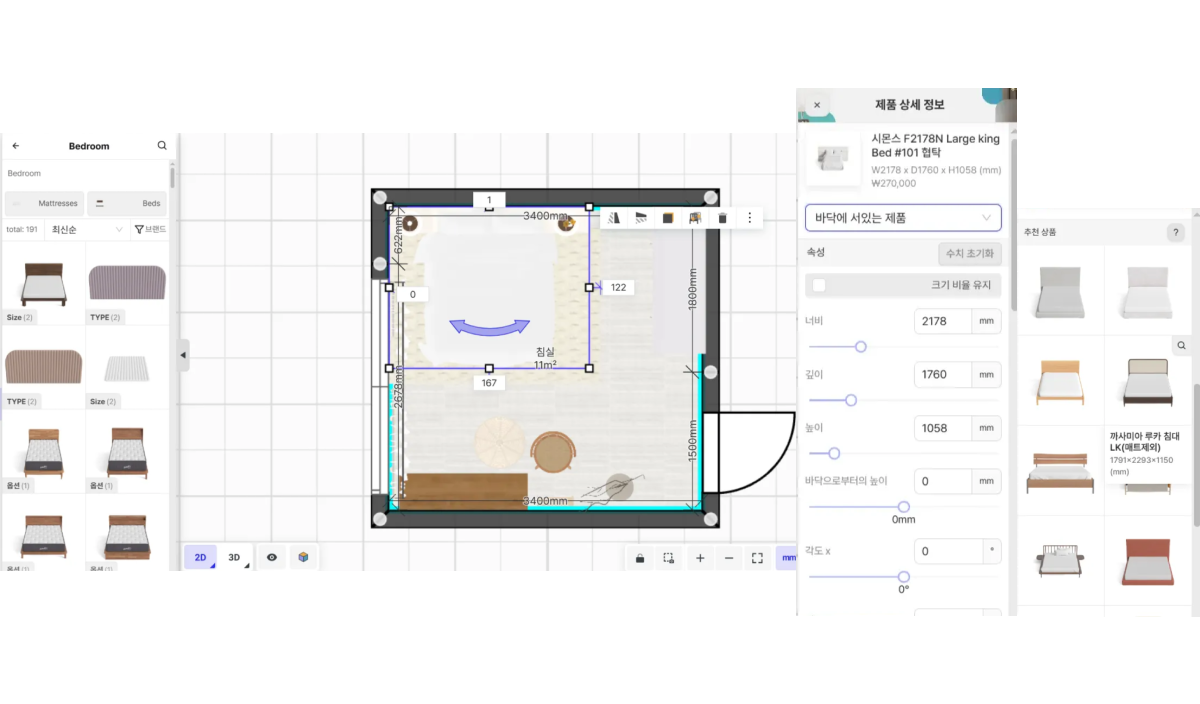
Unlike other tools where designers must create missing furniture or interior resources themselves, Archisketch provides a rich variety of assets, saving design time and increasing work productivity — making it a highly practical tool for professionals.
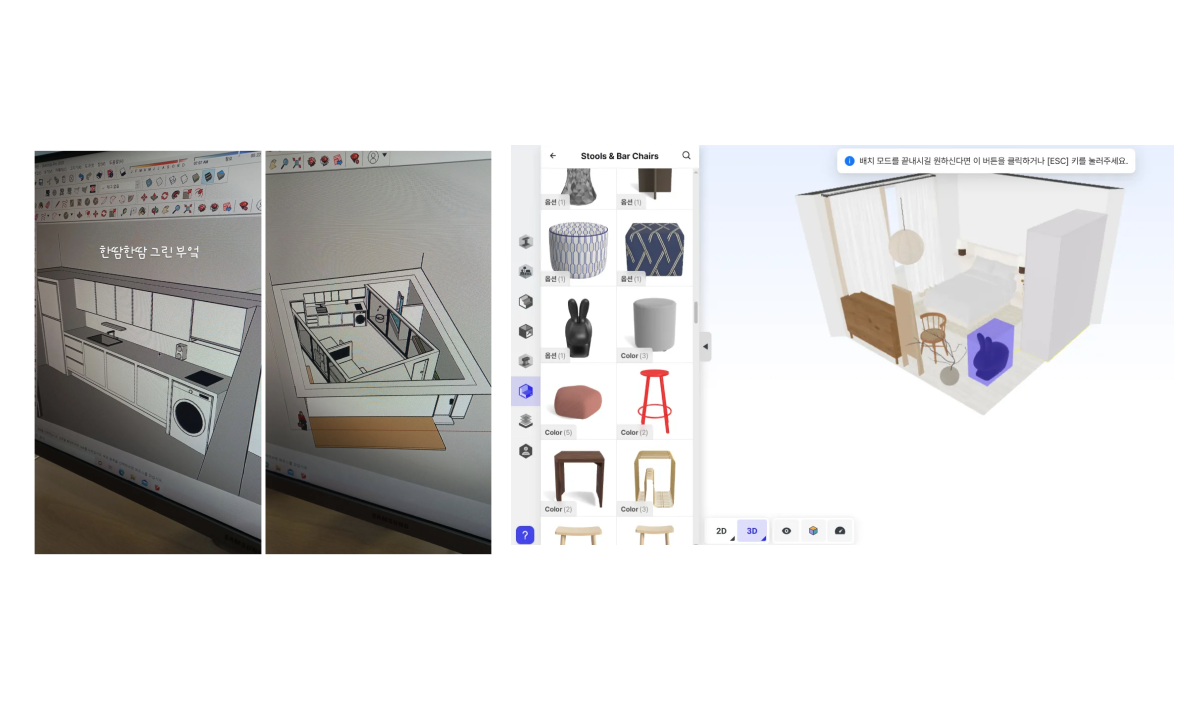
Left: SketchUp / Right: Archisketch
Step 5. Share 3D Design Results and Deliver Estimates
Is finishing the design enough? The real difference lies in how you present the results to your clients.
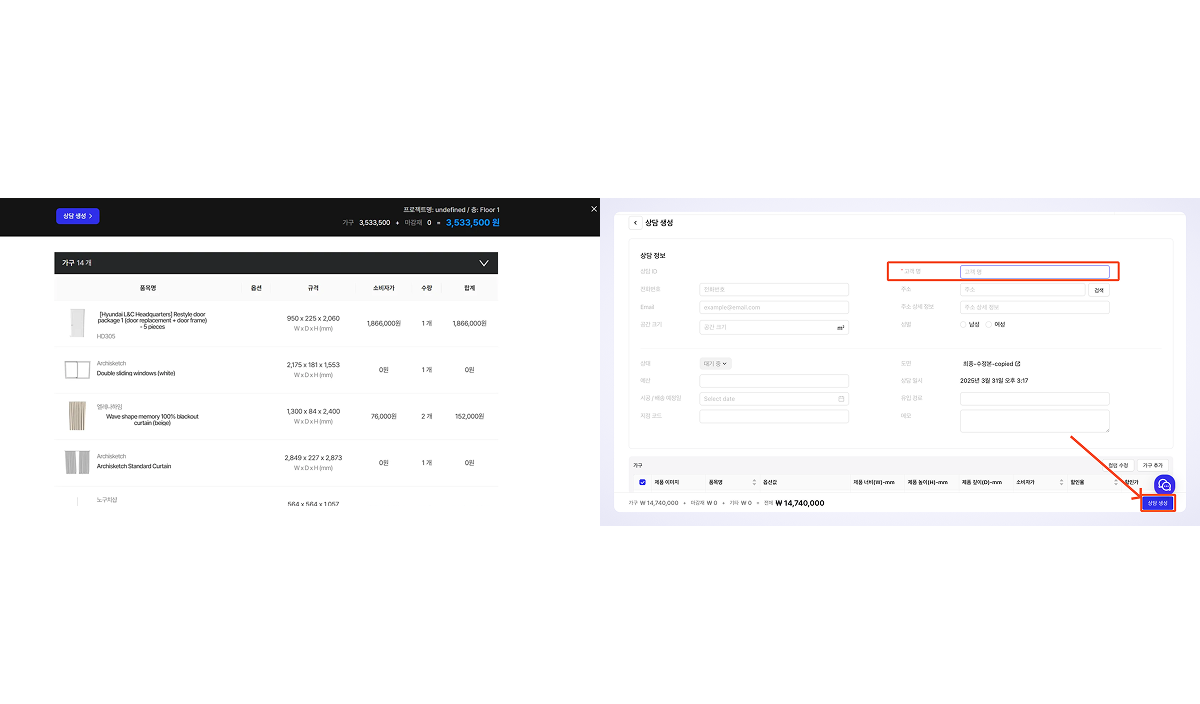
After completing the design, you can instantly share real-time estimates and 3D results with clients. Click the document icon on the top tab to generate real-time estimates showing used furniture lists, material info, and individual costs.
Use the consultation creation feature to input client info and consultation details, then share the estimate via a link (URL) or PDF download — speeding up consultation preparation.
Saved consultations are stored in the client list for easy communication and consultation history management.
Also, using Archisketch’s VR Tour feature, clients can experience immersive walkthroughs of the space. Through the design community, you can share various interior cases and portfolios to maximize persuasion. Check it out here: 👓 View Real Projects (VR Mode)
With Archisketch’s all-in-one 3D design program, you can handle design, consultation, and sharing seamlessly.
The 3D Design Tool Chosen by Professionals — Try It Now!
Experience the transformation Archisketch’s 3D program brings to your workflow. CEO Jongho Ahn of Shinsegae Interior Design previously used other 3D design tools, which required manually designing according to architectural specifications and had limited furniture/interior resources — causing much inconvenience.
After adopting Archisketch’s 3D program, he saved significant time by not needing to create missing resources. Moreover, displaying 3D simulations on a 50-inch TV during client consultations significantly increased purchase conversion rates.
If your company also wants to quickly increase productivity and improve consultation success rates like the above company, consider adopting Archisketch company-wide. Anyone can adapt within a day and immediately use it in architectural practice.
Must-Read Article for Architecture Industry Professionals
Archisketch
Fast, Easy, Reliable
share this post